Important Considerations For Fence Installation

Fence installation can be complicated and time-consuming, especially in areas with difficult soils or large rocks. It is also important to keep in mind the style and durability of your fence. Always check with your neighbors before starting any construction on your property. It is a good idea to let them know what you are doing so they are not surprised by noise or debris during the building process.

fence

Planning

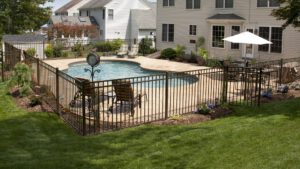
Installing a fence can be an exciting project for homeowners who are interested in creating privacy, preventing children and pets from wandering into a pool or yard and adding curb appeal to their home. However, there are a number of important considerations that need to be addressed before you head out to your local home improvement store to buy materials. This includes determining where you plan to build the fence, which material you want it to be made from and the style of fence that you desire.

You will need to check with your local city or town laws, zoning regulations and homeowner’s association rules if you live in an HOA neighborhood. Some cities and towns may require that you obtain a permit prior to construction, especially for very tall or complex fences. If a permit is required, you will need to submit detailed plans for review and approval. In addition, you will need to get a property survey prior to beginning work in order to ensure that the fence is built entirely within your own property lines.

It is important to determine whether or not your neighbor has any existing fences near your proposed building site, as the height of the fence you build will impact them. It is also important to find out if any local utilities are located in the area where you intend to build the fence. These may include underground water, gas or electrical lines. If any of these are in the way, it will be necessary to contact your utility provider to arrange for them to be relocated.

Before you start digging your post holes, it is a good idea to purchase a post hole digger or auger and a tape measure. This will allow you to dig the holes to a depth that will be strong enough to support your fence once it is completed. You will also need to consider the type of soil in your area, as sandy or rocky ground may require deeper holes than loamy or clay soils. Taking these factors into account can make the difference between a solid, long-lasting fence and one that will fail quickly.

Digging the Posts

Creating the post holes for your fence is one of the most time-consuming and laborious tasks in any fencing project. It requires precision and expertise, especially in rocky or sandy soil. It is also a job that is made even more difficult without the right equipment. There are a number of different tools that can be used to dig post holes, the cheapest being a shovel and the fastest being an earth auger gas or electric. However, even with the right tools, digging a post hole for a fence is still a labour-intensive and time-consuming task.

The holes must be dug to an exact size and depth in order for the fence posts to set properly. Local requirements vary but a good rule of thumb is to dig a hole that is as deep as 1/3 the height of the post. Many fence contractors may set the posts on the same day that they dig the holes, but this is not always possible.

Once the holes are dug they must be refilled with dirt in such a way as to keep the posts straight. This is a very difficult job because the dirt has lost its rigidity and must be repacked with a tool like a tamper, the back of a shovel or the head of a jackhammer. This must be done carefully so as not to knock the post out of alignment and it is also important to tamp down the dirt to ensure that it is compacted.

In addition to being a tedious and time-consuming task, digging post holes for a fence can be dangerous if you hit underground wires or pipes. It is recommended that homeowners and fence builders call their local utilities before starting any digging project to have underground utility lines marked for free. This simple step can prevent serious accidents and costly repairs. The best option for digging fence post holes is to rent a powered digger, which will make the job much quicker and easier. A digger is expensive but it will save a lot of time and effort in the long run.

Attaching the Panels

Before installing your panels, it’s a good idea to paint or stain them. This can help preserve the wood and protect it from weather damage over time. It’s easier to do this before you install them, as it’s much harder to reach once they are in place.

Fence panels are usually attached with screws or nails to posts that are sunk into the ground and either tamped down or put in concrete for stability. This makes them a bit different from fencing materials that are just tied to stakes or boards that sit on the ground, as those don’t really “sit” on anything. So, it’s important to have the fence posts in the correct location and at the right height.

To ensure your fence is properly aligned, run two builder’s lines across the ground between the first set of posts. You can then use the lines to mark where to dig for the next post. You may also want to brace the recently installed posts as you work.

When you’re ready to install the first panel, cut two short pieces of scrap wood to act as supports and screw them to the bottom facing edges of adjacent posts. Then, stretch a line level between the two of them and make sure that the bubble is centered. If it’s not, you’ll need to dig a new hole and add another post.

Once the ground is level, drive in the new post. Repeat the process with the other posts. When you’re done, the line level should show that the posts are perfectly vertical.

For the rest of the posts, dig holes that are about 10 inches deep and at least as wide as the post’s foot. Mix some concrete, and pour it in around the post. Let it cure before you finish putting in the rest of the fence posts.

If you’re using trellis or panel fences, you may need to attach the panel to the wall with metal brackets that can be screwed or nailed into place. This helps keep the fence stable, especially if climbing plants such as ivy are used to cover it.

Attaching Post Caps

Post caps not only add a nice finishing touch to your fence, but they also help protect the top of the fence posts. Without a cap, the end grain on the top of fence posts can absorb moisture and lead to rot and cracking. With a cap, the wood is covered, and the water is directed to the ground where it can evaporate. In addition, the cap can keep animals from using fence posts as perches and provide a barrier to wind and sun damage.

There are many different types of post caps available to choose from. Some are made from wood, and some are made from metal or vinyl. When choosing a cap, make sure it is appropriate for the type of fence you are installing. If the cap is made from wood, it should be treated with a preservative to protect against the elements. Wood post caps can be stained or painted, which allows you to personalize the look of your fence.

To attach a post cap, first, remove any loose debris from the top of the fence post. Clean the top surface of the fence post with a damp cloth or brush. Then, place the post cap onto the top of the fence post, making sure it is centered and straight. Secure the cap in place with carpenter glue or screws, if needed. If you decide to use screws, be sure to drill a narrow pilot hole before screwing them in, as this will prevent splitting the post.

When the glue is dry, use a power drill to screw in the screws. Be careful not to over-tighten the screws, as this can cause the post to rot and break. If you do not use a power drill, you can screw in the screws by hand with a screw driver. It is best to use a drill with a hex bit, as it will allow you to screw in the screws more easily and will not create splits in the post.

Once the post caps are in place, you can stand back and admire your work. This is the point in the process where your fence starts to take shape and gain its defining character. Depending on the type of fence you are installing, you may now be ready to install your panels or pickets.

The Benefits of Pool Fences

Pool fences are one of the best and most effective ways to prevent tragic drowning incidents from occurring. They are a great addition to any backyard pool and come in many different heights, styles, and materials.

Pool Fences

Solid fences offer privacy and contain your yard visually. They can be used in combination with other fencing options to create a custom look for your yard.

Drowning is one of the leading causes of death in young children, and it can be almost impossible to save them once they have fallen into the water. Fencing is a simple way to keep curious kids and pets away from pools so they don’t accidentally fall in and drown.

A good quality fence will be tall enough to prevent toddlers and other small children from climbing, as well as strong enough to stop them even if they are able to climb. They should also be designed to have gates that swing away from the pool and require a child safety lock to open them. Most areas have regulations regarding how high and wide a pool fence should be, so it is important to know what your local laws are before you decide on which type of fence to purchase.

In addition to fences, there are also a variety of other ways to keep your pool and its surroundings safe. A pool cover is another option, but it can be a hassle to maintain and can easily get in the way of enjoying your yard. It can also be difficult to see if the cover is working correctly, which can lead to accidental falls.

Fencing is a far more reliable way to protect your pool area than either of these. Several studies have shown that fencing that completely surrounds the pool and isolates it from the house is more effective at preventing drownings than fencing that only partially encircles the pool. These studies have used data on houses with pools, death certificates, and autopsy reports to identify potential cases of drowning among children under 14 years old. They have then compared these households to a control group of similar houses without a swimming pool.

In these case-control studies, pool fencing that completely encircles the pool has been found to reduce the number of drownings by about three quarters. However, there are still a significant number of deaths that can be prevented by other means, including improved supervision and by installing barriers around bodies of water at public recreational facilities.

Aesthetics

When it comes to pool fences, the safety standards set by government regulations are often enough to trump concerns about aesthetics. However, that doesn’t mean that your fence has to look drab and industrial. In fact, many of today’s most popular pool fence ideas beautifully blend function with style.

One of the most popular styles is the white picket fence, which gives your pool a classic look and pairs nicely with gardens and landscaping around your home. Another trend is the spliced wooden fence, which creates an artistic maze of planks that offer privacy without feeling too closed in. You can even intertwine fairy lights or climbers to add a whimsical touch during evening swims.

Stone walls are another beautiful option for pool fencing. These natural barriers evoke the grandeur of historic fortresses and pair well with wooden deck chairs. They’re particularly appealing if your house is finished in a complementary brick. For added flair, consider incorporating small alcoves into the wall, where you can plant flowers or succulents.

Wooden fences are also a classic choice, with the timeless elegance of stained and untreated wood. Light stains highlight the wood’s beauty, while dark stains create an avant-garde look. Staining also allows the wood to age gracefully, enhancing the rustic ambiance of your poolside oasis.

If you’re looking for something more contemporary, a glass fence can provide a sleek and modern edge to your pool landscape. These transparent options meet all necessary regulations while offering an unobstructed view of your pool, making them ideal for modern homes with panoramic backyards. You can even elevate the look with tinted glass to add a hint of color and a pop of interest.

Finally, metal fences are an excellent choice for a traditional poolside aesthetic. They’re also durable, and they don’t need to be painted to resist rust and corrosion caused by prolonged exposure to the elements. These fences are simple to clean, requiring only occasional washing with mild soap and water. They’re also highly affordable, and they come in a variety of colors to complement your pool.

Privacy

While no pool fence can be completely child or pet proof, a well-designed and installed one can significantly reduce the risk of accidents. It also helps to keep unsupervised children or adults out of the water until adult supervision is present. This is an especially important feature when it comes to pools in residential neighborhoods, where neighbors or passersby may be able to view the swimming area from their homes.

Most communities and even some states require that a certain height of fencing be in place around all residential pools. In addition, the fenced area should not have any openings that could be used as a means of entry into the pool. This can be achieved with a variety of fencing types, such as closed-loop gates, which prevent the accidental or intentional entry of small children.

While this isn’t the most decorative or eye-catching type of fencing, it does provide a very practical and safe barrier to your home pool. It’s also very easy to keep clean, as it’s made from UV-resistant and rust-resistant PVC resin. This pool fence kit comes in a set of 8 fence sections that can be easily assembled to wrap around your pool. If you need more than that, you can purchase additional kits.

Another popular fencing option for home pools is wrought iron, which is available in a variety of styles and colors. Its slats can be spaced close together for more privacy or further apart to allow for air flow around the pool. Wrought iron fences are typically more expensive than other types of pool fencing, but they’re sturdy and will last a long time.

A more cost effective, but still attractive option is a brick wall fence. It’s relatively cheap to install and can last a lifetime. It can also be painted or covered in a mosaic for extra design appeal.

For a less permanent solution, try adding some plants to your pool fence. Closely spaced shrubbery like boxwoods, hydrangeas, laurels, and junipers create an appealing green screen that will help to camouflage the fence while providing privacy. If you want a more vibrant look, consider growing vines such as clematis or wisteria on your fence. They will eventually begin to cover the surface and block anyone’s view of your pool.

Security

One of the biggest benefits of a pool fence is security. It provides an extra layer of protection that keeps kids and pets safe 24/7. It means that you don’t have to be on the lookout for them and can relax knowing that they aren’t going to slip into the pool.

To ensure that a pool fence is secure, it should be properly installed and equipped with safety features. For example, gates should be able to close and latch automatically without the need for a manual lock. They should also be high enough so that children cannot reach them. This will help prevent them from being opened by curious kids who want to access the pool area. A high-quality, automatic gate can also help keep burglars out of the backyard.

Another important feature of a secure pool fence is its height. Most city codes require a minimum of 4 feet for pool fencing, which is below the line of sight for most adults and provides an effective barrier that can’t be scaled. A well-made, tall fence should be solid and smooth, with no footholds or gaps that could be used as climbing points.

A fence should also be made of a durable, weatherproof material like aluminum or vinyl. This helps keep it in good shape and is easy to clean. A black aluminum fence, for instance, has a sleek profile that is perfect for pool security and looks great, too. It’s also an economical option.

There are many different styles of wood fences that can be built around a swimming pool, from rustic raw wood to more refined wrought iron. A wood fence can also add natural beauty to your home, depending on the finish you choose. It can be a cost-effective way to achieve privacy as well, depending on the type of wood you use and the height of your fence.

A mesh fence is a popular choice because it offers safety and versatility. It can be left up permanently or rolled up and put away during parties and other occasions when a fence isn’t needed. It is also easy to set up and affordable. Most of these fences are designed as do-it-yourself kits that can be assembled by homeowners and don’t require professional installation. They are often sold in 12’ sections that can be connected to create a fence that fits around your pool.

How to Keep Your Fence Looking Great With Proper Fence Maintenance

Your fence takes quite a beating, being constantly exposed to wind, rain, and snow. Proper maintenance from https://rcfence1.com/ can keep your fence looking like new and functioning properly. Start with a thorough cleaning. Mold, mildew, and dirt buildup are sure to damage your fence over time. Also, make sure to check for and hammer in loose pickets.

Clean It Regularly

fence maintenance

Cleaning a fence regularly is one of the best ways to keep it looking great and prolong its lifespan. This process removes buildup of dirt and grime that can leave your wood fence with a discolored appearance. Cleaning is also necessary for removing mold and mildew as well as more stubborn contaminants like rust. Wood fences are exposed to the elements and can collect dirt, dust, sand, leaves, grass clippings and more. The regularity with which you clean your wood fence can depend on how often it becomes discolored, but every three to five years is a good rule of thumb.

A regular hosing down is enough to maintain a clean and healthy looking fence, but power washing might be necessary in order to get rid of more serious stains. This is especially true if your wood fence has reached the end of its life and is beginning to show signs of serious damage and wear.

If you decide to use a power washer, make sure to use it at a low-to-medium pressure and always follow the manufacturer’s instructions. Using high-pressure water can damage your fence and even strip it of its protective seal. To avoid this, it is best to work in small sections and rinse your fence with a garden hose afterwards.

Start by wetting the area you wish to wash with a hose and apply the cleaning product, such as a commercial masonry or deck cleaner, following the manufacturer’s instructions. Be sure to scrub any clumps of dirt with a brush and to rinse off the fence thoroughly. If you notice any stubborn stains, such as green algae, apply an oxygen bleach solution (such as Oxyclean) to the stain and let it sit for 10 minutes before scrubbing. Rinse off the fence again with a hose and repeat as needed until your wood fence is clean.

Be sure to rinse the detergent off your wooden fence with a hose in a fan pattern to avoid any streaking or damage. Then, allow your fence to dry completely before you stain it or paint it.

Repair Damaged Sections

If sections of your fence are starting to look saggy or have loose pickets, this is something that should be addressed right away. The longer these problems go unresolved, the worse they’ll get. If you catch the problem early, it will be much easier and cheaper to fix.

Ideally, you should take a walk around your property every month or so and carefully inspect each section of the fence. Check for damage or rot and make sure each section is securely connected to the next one. You should also check the hardware, such as hinges and latches, to ensure they’re working properly.

For wood fences, it’s important to regularly clean and stain them. This protects the wood from the sun and elements, keeping it in good shape longer. It’s also a good idea to reapply water-repellent stain or paint every few years.

When a wood fence is damaged, it’s usually easy to replace the affected slat. You’ll need a few tools, including a hammer and chisel or screwdriver. First, remove the caps on the posts on either side of the affected slat. Then, using a hammer and chisel, loosen the screw that holds the top railing to the tabs inside the post. Once the slat is removed, simply pull down on the other end of the bottom rail and then start pulling slats off until you reach the damaged one. Replace the damaged slat, then screw or nail the top rail and post cap back into place.

If you have a chain-link fence, use lineman’s pliers to bend the ends of the ties that hold the fabric in place. This will free them from the fence and allow you to cut or loosen the fasteners that held the old rails. Once you’ve removed the old rail, mark the spot where it will be replaced on the new rail. Use a pencil to outline the replacement area on the old rail, then mark that same spot on the new rail and cut it at the marks you made.

If the decorative sections of your wrought iron fence are starting to separate, this is probably a sign that it’s time for an upgrade. Wrought iron professionals will normally weld the sections together, but you can make a sturdy repair by mixing up some epoxy repair putty and applying it to the joints. You can purchase this type of repair putty at most home improvement stores.

Apply a Fresh Coat of Paint or Stain

As time passes, your fence may need a fresh coat of paint or stain to help it maintain its good looks and protect the wood. A new coat of either can help deter rot and insects, while a fresh stain provides an attractive natural look for the entire fence. Before you apply a new coating, thoroughly inspect the structure to ensure it’s strong and stable. You should also repair or replace any rotting planks to prevent further damage and decay.

If you’re going to paint your fence, wash it first to remove any dirt or debris that may be preventing the new coat from adhering properly. You should also clean any rotting boards, scrape off any peeling paint and scrub the surface with a fungicidal wash to remove any algae, mildew or wood rot. This step is particularly important if you’re painting over an existing coat of paint; without it, the new finish can flake or peel off in patches.

Once your fence is washed, you can begin the process of applying a new coat of stain. If you’re working with a sprayer, follow the manufacturer’s instructions to ensure you’re using the right amount of pressure and the sprayer is set to the correct nozzle setting. Otherwise, you can use a brush, pad or roller to stain the slats. If you’re using a roller, be sure to apply the color in two- to three-foot sections at a time and make overlapping strokes for even coverage that’s free of lap marks.

Staining a fence is relatively easy and more affordable than painting, but it does require a bit of prep work. Depending on the weather, you should wait for dry conditions before starting. You should also cover surrounding plants to prevent stains from spilling or staining them.

While it’s difficult to say exactly how often a fence needs to be stained or painted, it’s safe to assume that the climate will play a large role in this. In rainy areas, you’ll likely need to refinish your fence more frequently than in arid regions, as moisture can do the most damage to unprotected wood. A good way to determine if your fence is in need of a fresh coat is by watching how water beads up on the surface – when it no longer beads, it’s probably time for a new stain.

Trim Vegetation

The grass and weeds that grow close to your fence aren’t just unsightly, but they can also damage it. Weeds and grass can trap moisture near the wood of a fence, which can lead to rot or rusting. There are a few ways to prevent this, including using herbicides or trimming with a trimmer. If you use herbicides, speak to your neighbors before spraying along property lines as they may want to protect their gardens.

If you choose to use a trimmer, take the time to carefully trim all sides of the fence for a clean appearance. This saves a lot of weeding and prevents the need to go back over sections later.

You should also check to see if any pickets are loose or need to be re-nailed. Loose pickets can allow for insects to enter your yard, so it’s important that they’re secure. Loose nails can also cause your fence to lose its structure and appearance. Checking and re-nailing pickets is an easy job that can be done during a regular maintenance visit.

If your fence is made from wood, it should be re-stained at least every three years. Staining helps to keep moisture and UV rays off of the wood, which helps to prevent rotting and mildew. Staining can be done with a brush, sprayer, or roll, but it is recommended that you sand each trouble spot before touching up.

Aside from staining, it’s also important to keep up with other maintenance tasks. These include regularly raking up leaves and other debris that can pile up near the fence. Moisture trapped in these leaf piles can hasten the decay of a wooden fence, so keeping them cleared away is essential.

If you notice any signs of insect infestation, be sure to contact a pest control specialist right away. Insect infestation is a serious problem that can cause major damage to a fence, especially if it’s made of wood. It’s also recommended that you apply a protective coating to the posts of your fence, especially those in areas with plenty of rainfall. This helps to prevent rotting and insect infestation.